Showing posts with label tutorial. Show all posts

Wednesday, February 3, 2010

Glass jar surprise

For my birthday, I was lucky enough to receive this lovely glass jar with a fun gift card inside from my mom. It was such a cute idea, I figured I would share the steps involved in creating this package.


Supplies:
- standard size mason jar
- 2 piece standard mason lid
- crumpled brown Kraft paper or tissue paper
- 2 x 32" Martha Stewart baker's twine or other funky twine
- shredded sheet music
- gift card

Using a small plate (8-9" in diameter) as your guide, trace a circle onto the Kraft paper and cut out. Place a small amount of shredded paper in the bottom of the jar. Place the card in the center of the jar and stuff more shredded paper on each side and on top of the card until it's no longer visible. Screw lid in place. Place a small piece of scotch tape in the center of the Kraft paper circle and center over the lid. Press firmly to secure. Since the twine was thin, I cut 2 pieces of the same length. While holding the Kraft paper down close to the jar, tie the twine around the neck of the jar and make a bow.


Pretty easy don't you think? My boyfriend also received one with shredded maps instead of the sheet music. Not only do they make a cute present, they also make for a cute decoration. I'm using them on my mantle here.

Tuesday, January 19, 2010

Matchbook Cover Collage Tutorial

Back in 2006, my boyfriend and I bought our first house, an 1950's bungalow. During our first Spring at the house, we discovered a large (and I mean large) bag of matches in our little shed. The extensive collective had been left, presumably by the previous owner, next to an old lawnmower and a can of gasoline. For obvious safety concerns, we brought the matches inside and started rummaging through the pile. There were matches from Ford, motels & hotels, insurance companies, tomato sauce companies (with recipe printed inside the cover), matches made from spaghetti and the list goes on.

Initially I didn't think of crafting with the matches so whenever we would have smokers over at the house, we would offer a bag of vintage matches as a parting gift. After a few years, our pile dwindled down and most of our friends quit smoking so I decided to make a little souvenir of our discovery.


Steps:

With a pair of scissors, I carefully cut the front of about 50 matchbook covers. In some cases, I had to remove the back staple. This part was annoying since most staples were rusted. I suggest buying your frame in advance so you can roughly plan the placement of each matchbook cover.

On a 11" x 15" medium weight paper (made for acrylic paint), I glued each little matchbook in place using a regular glue stick while leaving only a 1/4" spacing between each cover. Once the glue dried, I place the collage in a double-matted frame I bought at Deserres (my new favorite craft store).


Here's a few close-ups of my favorites covers:


My favorite is "Tout pour le fumeur" which means "all for the smoker".

Friday, May 2, 2008

Tutorial - collage on a canvas

My walls were still bare after living in the same house for 2 years. It was time for a change so I decided I would make my own art. I started by buying a blank canvas at Micheals, some Modge Podge and a book from Salvation Army I got for 35cents.
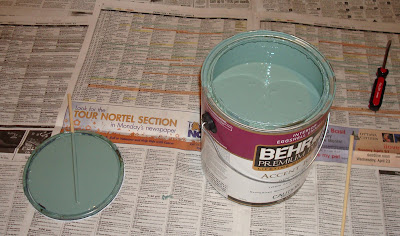
The canvas was already primed so I just needed to do 2 coats with some leftover basement paint. I realized that I was out of paint stir sticks so my handy boyfriend improvised and found me some chopsticks.


While I let the canvas dry, I started cutting out various circle shapes.

Once the paint was completely dry, I started gluing the circles in various positions.

I decided to leave a bit of the canvas blank and honestly at this point I had had enough! The very last step was applying 2 coats of Modge Podge all over the canvas. At this step, I learned lesson #1 - paper circles need to be properly glued to avoid bubbling and curling. Thank god the paper is old so it kinda blends in.

Lesson #2 was a bit more difficult. As we were hanging the canvas on the wall, I noticed that the canvas was warped. I'm not sure why I didn't notice this earlier. After an hour and a half, my boyfriend finally figured out a way to hang so it wouldn't show. Phew!

As you can see, I'm no expert at making art collages but it's still a great way to add a bit of character to your walls for under $30.

LinkWithin

Related Posts with Thumbnails